
Forgot Password
Solved
Bolivar1830 Posted messages 110 Registration date Status Membre Last intervention -
Hello,
Following the passing of my brother-in-law, I have acquired two Macs for which I have no manual or identification documents.
- 1 iMac OS High Sierra version 10.13.6 - Serial No. C02T626ZGG78
- 1 iMac: Model No. A1311 - Serial No. C02FM1YUDHJN
Although Macs are new to me, I was able to easily access and use the first one.
However, I was unable to access the second one: upon powering on, I get a black screen with a small window asking for a password that I do not know.
I have consulted numerous forums to find a solution to unlock the system, but each time I am instructed to reset from the login window, which I do not have since I only have a black screen.
Can someone help me resolve my issue?
Thank you in advance.
18 réponses
Hello,
Here are your 2 iMacs:


As for the password, it is either an "ordinary" session password or a firmware or internal program password. If that is the case, it will not be possible to bypass it, and the Mac will need to be taken to an authorized Apple service center for unlocking.
Based on your indications of "black screen and small password window", I am afraid you might be in the second case. (note that in this case, you will also see a small lock on the screen).
If it is just a simple session password, which I doubt, but just in case...
- Turn off the Mac
- Restart the Mac while holding down the cmd and R keys to boot from its recovery partition
- When the OS X Utilities window appears:
- Go to the menu bar in the Utilities menu / Terminal
- WARNING: do NOT go to Internal Program Password Utility
- In the Terminal window, type this word:
resetpassword
- In the following window, choose the affected hard drive,
- Then select the user from the list of users on that disk
- Enter the new password
- Confirm the new password
- Optionally enter hints to retrieve this password
- Click the Save button
- Click the ACL reset button as well
- Exit the password reset window
- Exit the Terminal
- Exit the OS X Utilities
- Restart the Mac.
Afterwards, there may sometimes be messages due to the fact that the Keychain will contain old incorrect passwords.

Thank you Francis,
There has been some progress with the instructions you gave me. But it's not getting very far.
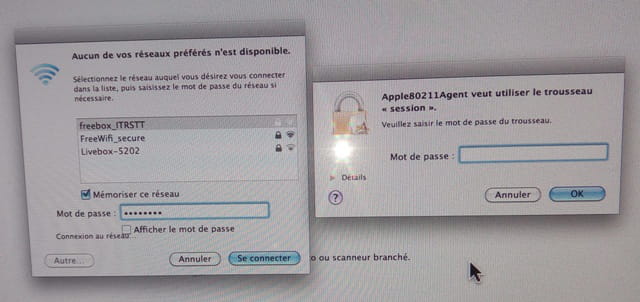
The simultaneous command cmd and R when restarting the Mac now shows me a white screen with a small window (turning globe) and a request: "Choose a network." I then choose the network I use (freebox_ITRSTT) which has a small padlock on the side. After selecting the network, another window appears (still with the small padlock) and a field where the cursor blinks, inviting me, I suppose, to enter a password. I then enter the same password I used for the first Mac (the Wifi code I defined at that time).
Unfortunately for this second Mac, the code is rejected and the input field turns white again with the blinking cursor. Thinking I was making a mistake, I tried the same password several times; I even used other passwords, but the screen stays the same: white screen and window waiting for the network password.
Is there a solution, in your opinion?
I fear that, as you said, I might have to take a trip to customer service!
Does the screen look like the one on this page:
https://support.apple.com/fr-fr/HT204455
EDIT: see also:
https://support.apple.com/fr-fr/HT201314
It looks like it. To give you a better idea, I took a photo of the 4 different pages that appear after restarting.
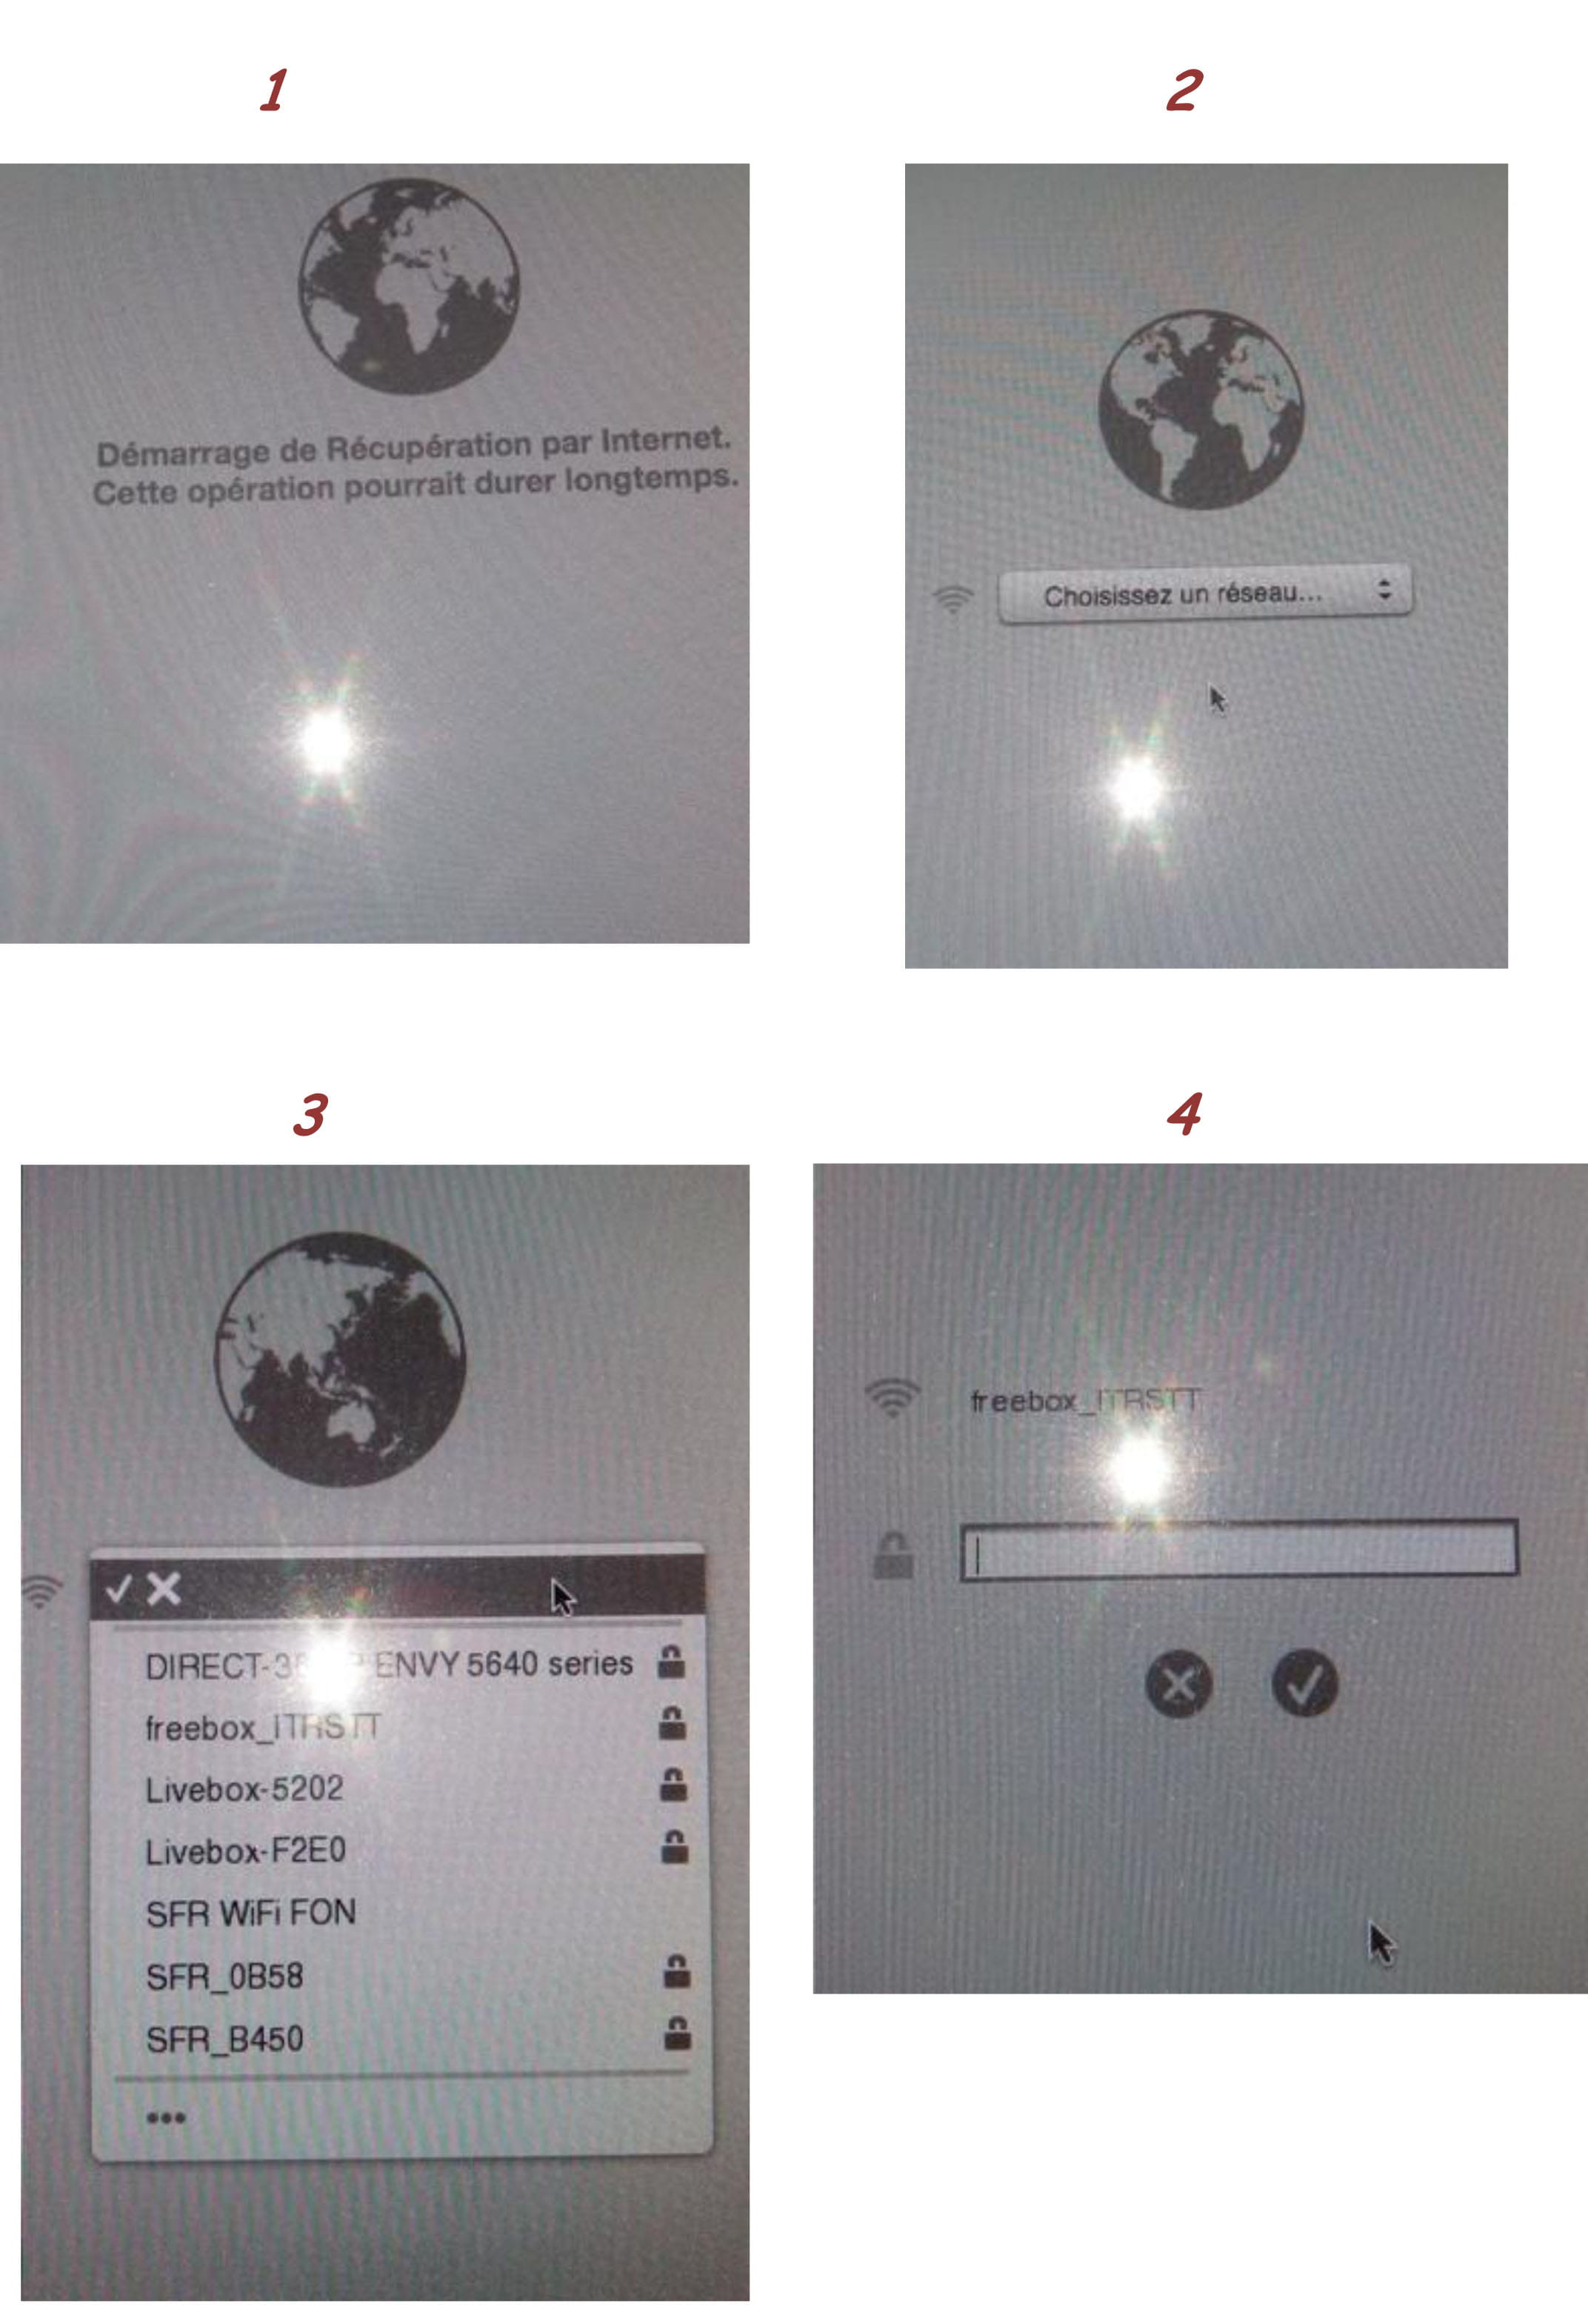
Here it is. Here they are.
Here, these are screens that require the WIFI network access key, not the session password.
In this situation, it often happens that the keyboard is switched to QWERTY mode, which may explain the connection failures to the WIFI network. Try to see where your keys are on this example of a QWERTY keyboard
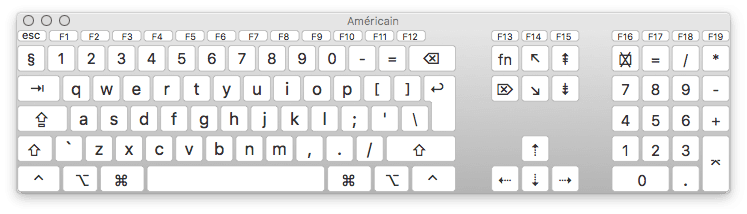
with the shift key pressed:
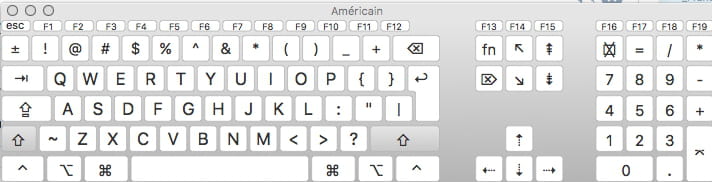
Bingo! The keyboard was indeed switched to Qwerty mode! I corrected the input and several pages followed one after the other.
The first one shows the MAC OS X window. I clicked on "Disk Utility" + Continue.
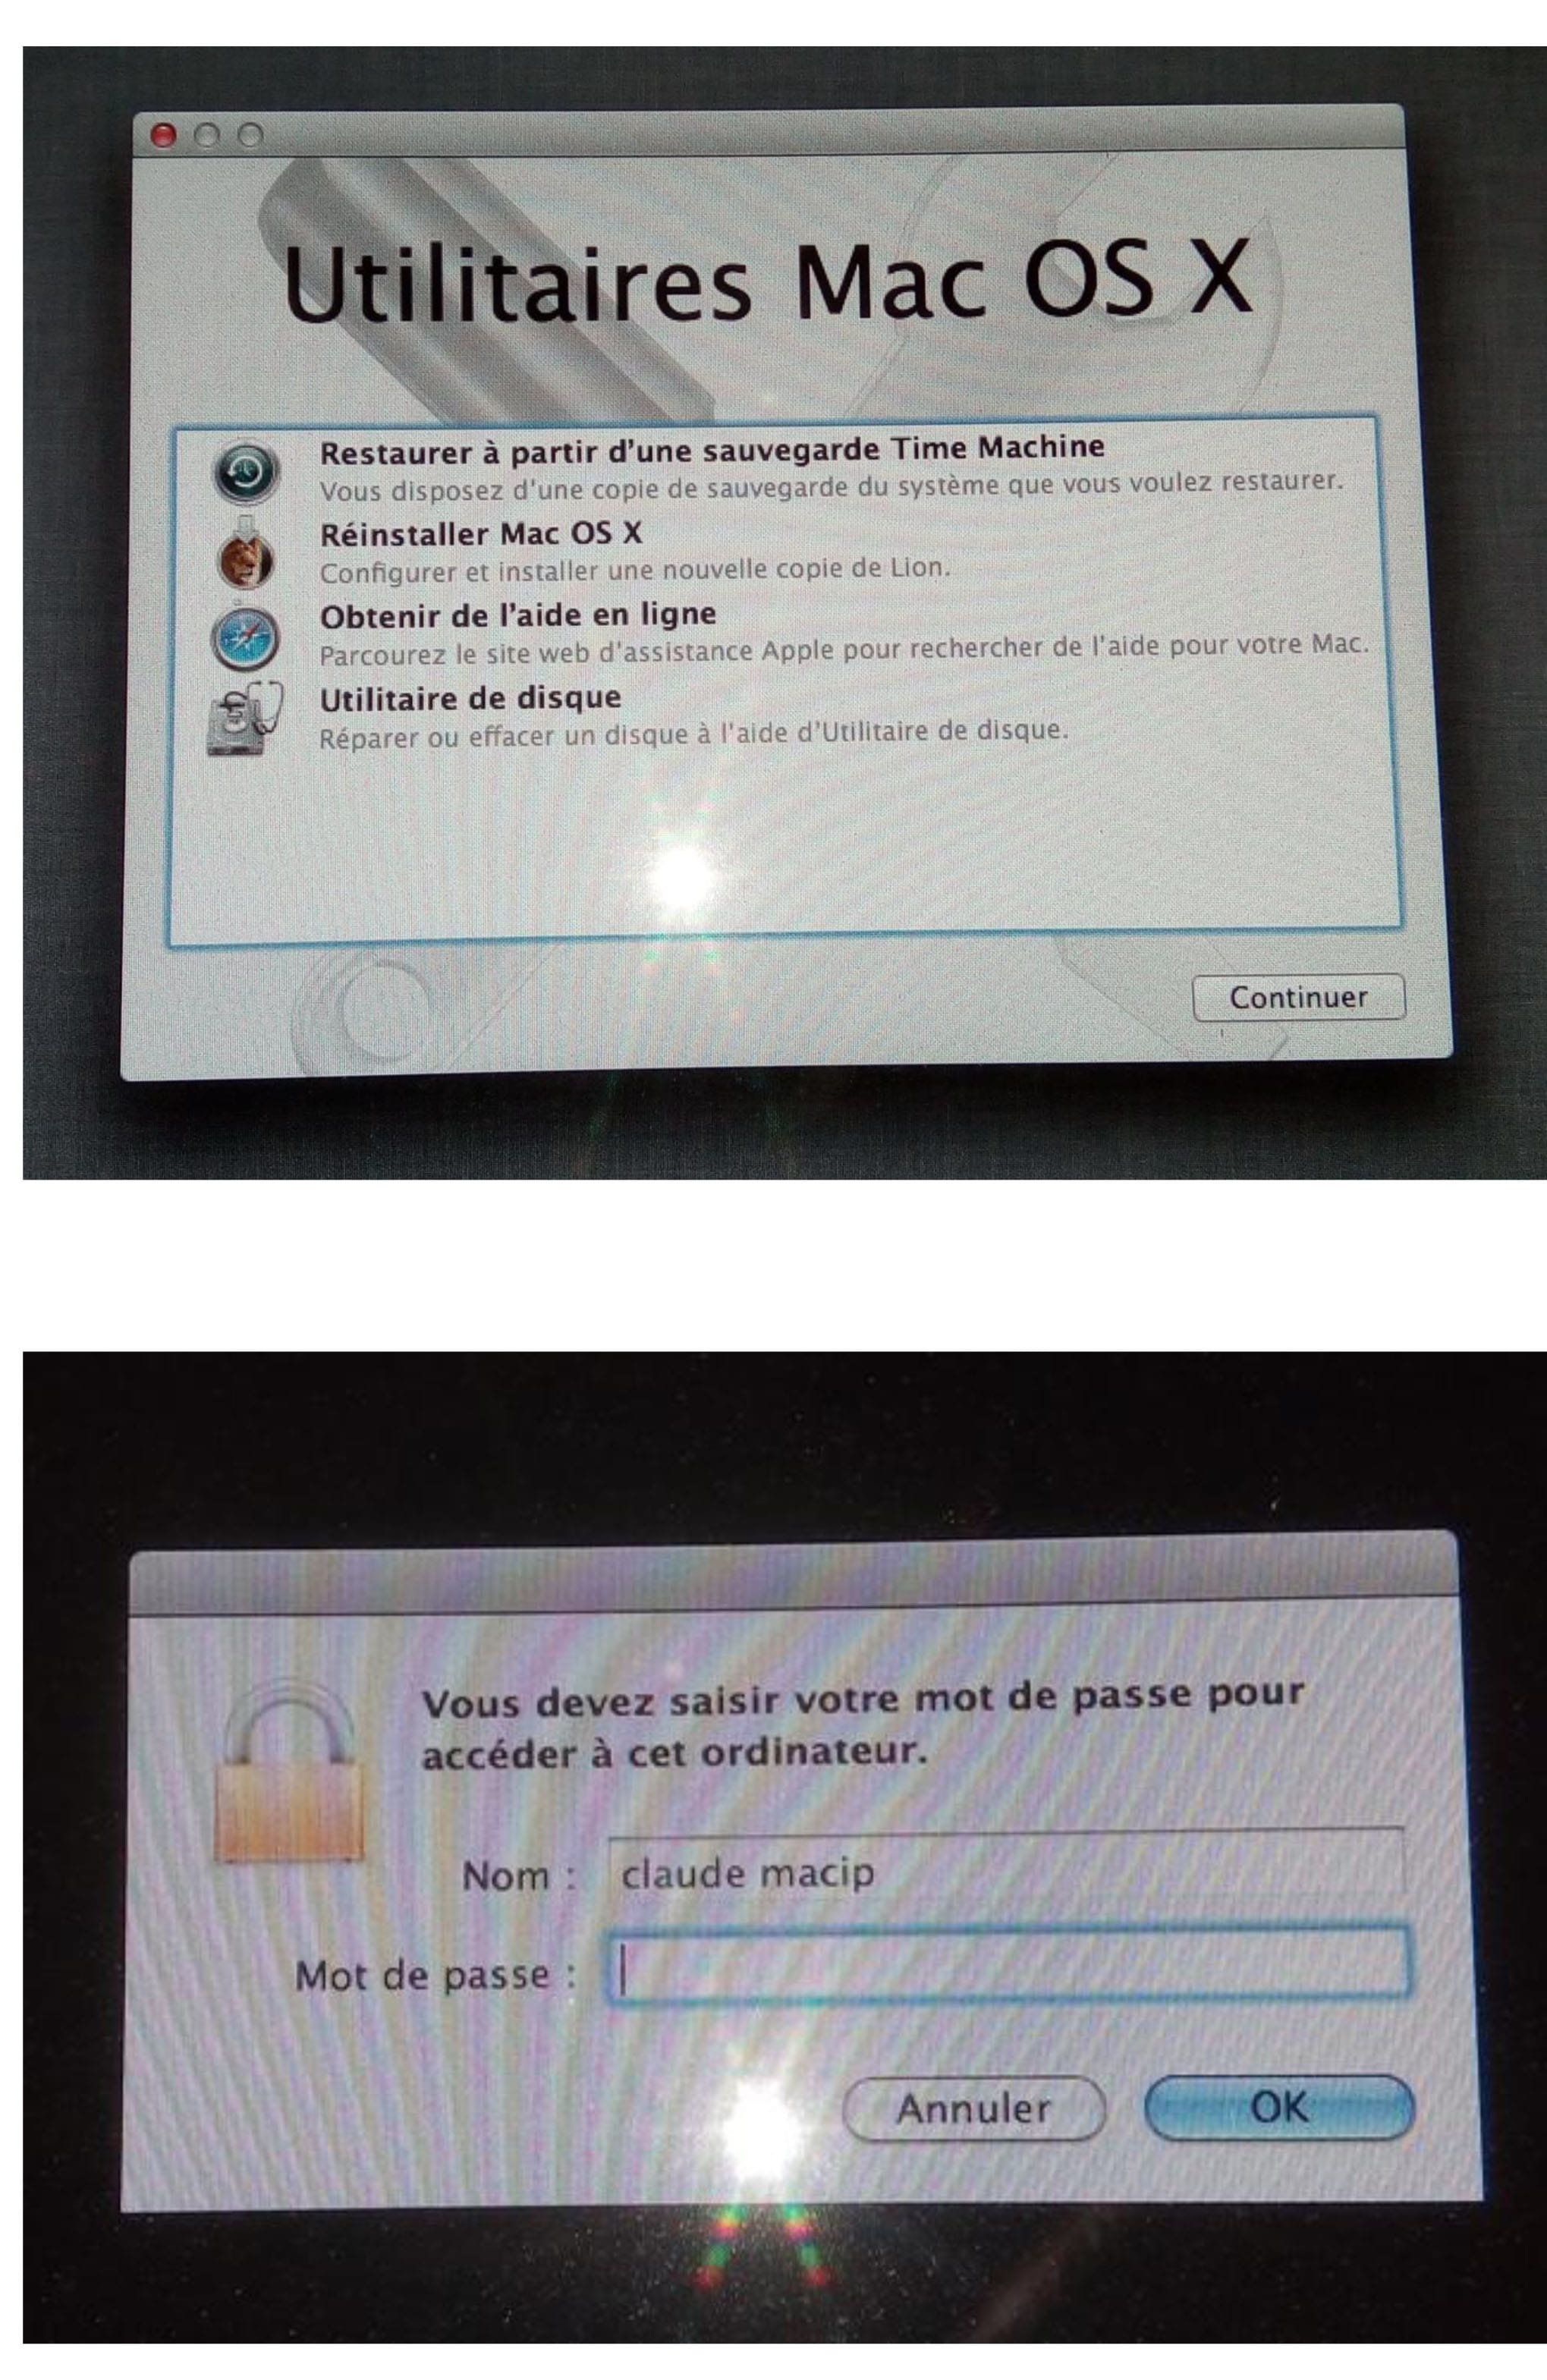
Another window appeared, but I didn't think to take a photo (I was asked to restart the computer). Then another window appeared above where I was asked to enter a password (which I don't have, of course). I'm at this point now and I will give up for tonight.
Could you please guide me to finish solving the problem? Thank you in advance. Good night.
Well, since the Mac is able to start from the recovery partition, that's a good sign, so when the Mac has booted from this macOS Utilities window, do not go to Disk Utility, but from the menu bar, go to Terminal, to reset the password as I explained in my first response...
Hello Francis,
That's what I wanted to do last night, but with fatigue...
This morning I restarted the computer, .... but no Mac OS Utilities window (like I had yesterday). However, on a white screen, the Apple icon appeared, .... then a black screen with the second window ("You must enter your password"). And no access to the menu bar or Terminal to continue the procedure you detailed for me yesterday.
Did I miss something, or are my Mac skills too weak?
Hello,
restart the Mac while holding down the cmd and R keys to access the macOS Utilities window, and then access the Terminal from the menu bar
Re-bingo, Super. I followed all the instructions to the letter and of course everything is unlocked, ... but ... a problem arises with the Keychains. See Photo. I'm browsing through the help, but I can't find the solution.
Do I need to take a break until noon? I'll pick it up this afternoon.
Thank you for the help.
For the first photo, it involves using the wifi network of the place where you are... password linked to your box.
The second photo concerns the password of the Keychain. The latter must be protected by the password of the previous owner if you are in their session...
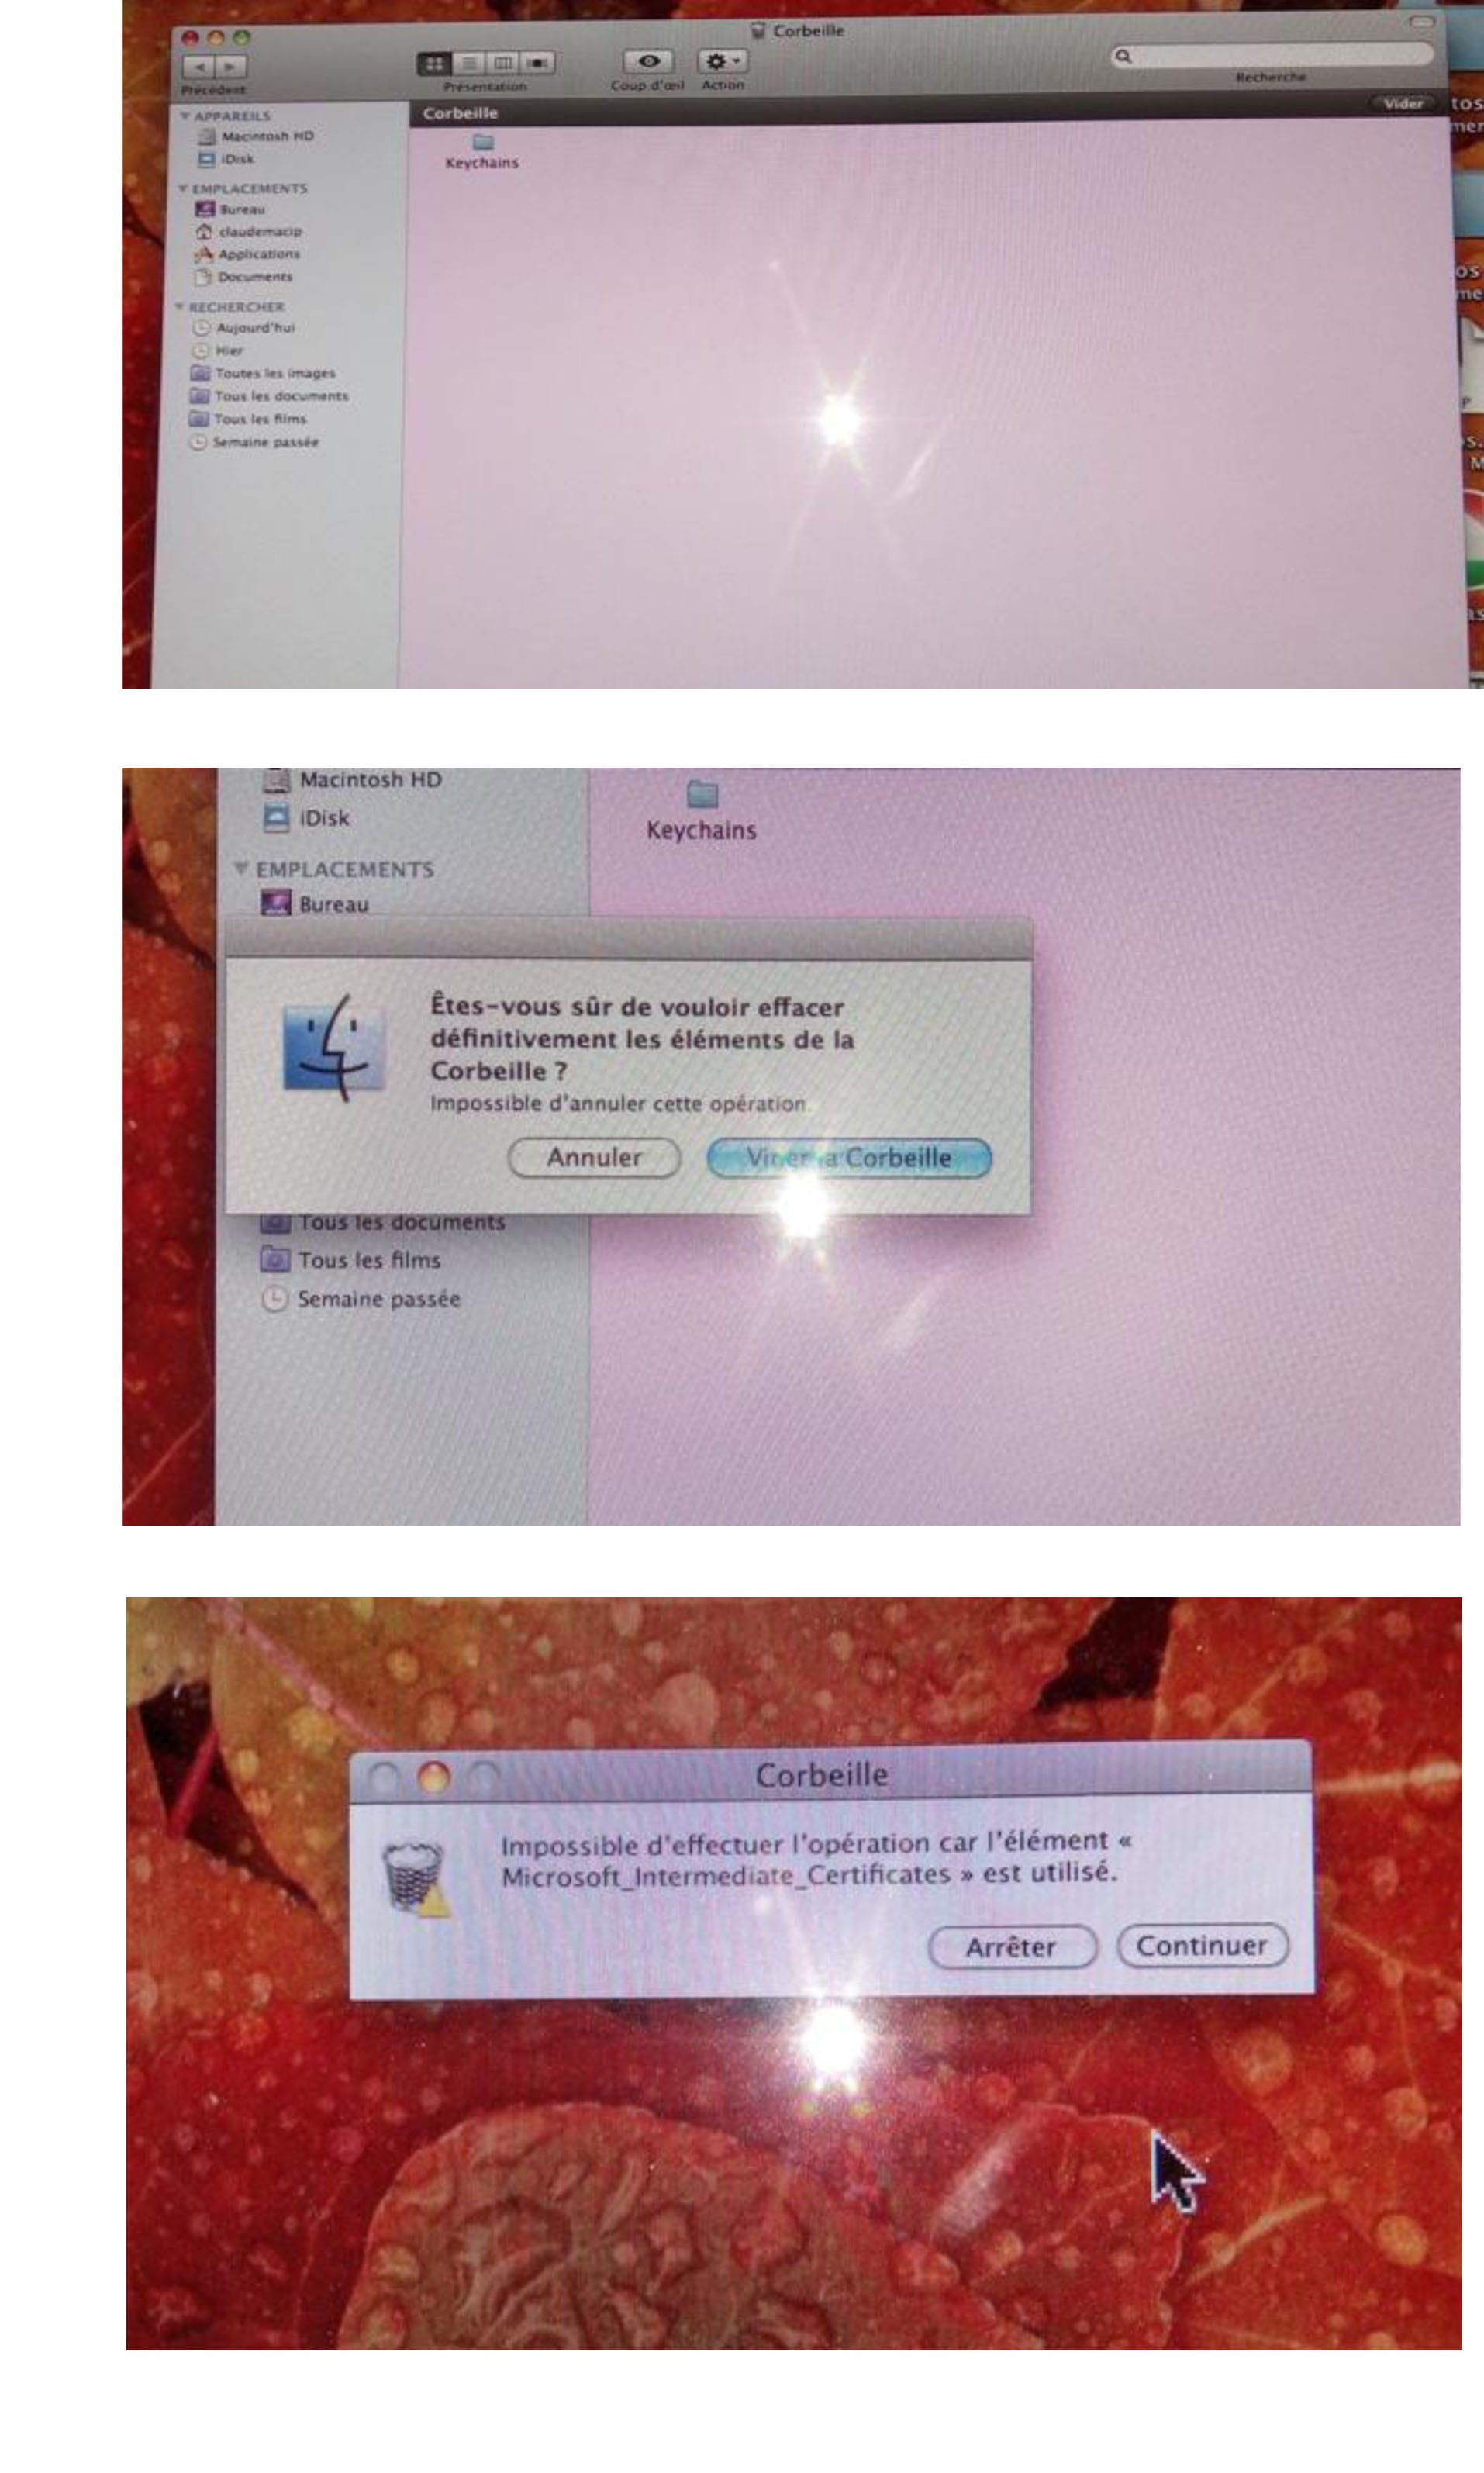
In any case, since you do not know any passwords of the previous user, the best thing to do at this stage is to delete all the content from the Keychain. To do this, from Finder, go to the Go menu while holding down the alt key; you should then have your Library offered in the dropdown menu.
So choose "Library", there, locate the "Keychains" folder, put it in the trash, and empty the trash.
Then, from the Apple menu, go to System Preferences,
in System Preferences, click on the "Network" button, in the following window, at the top, under Configuration, drop down the menu to choose "Edit configurations", click on the + ("Plus") button to add a new configuration, for which you enter the name of your network, and you remove the others if they exist by selecting them and clicking on the - (minus) sign.
Prefer an ethernet connection if possible, but if not, enable WIFI and enter the access key for your box.
Also check the box to Show Wi-Fi status in the menu bar.
Click the "Apply" button at the bottom right
At this stage, you should be in a session for which you know the username, its freshly reset login password, have your wifi network, and be rid of obsolete old passwords.
So, restart the Mac normally and see how it goes...
For the WIFI network, no problem.
For the Keychain content, in Finder, I click on "Go" while holding down the alt key and I get the page below (see photo), but the Library does not appear in the drop-down menu and therefore I cannot locate the "Keychains" folder to move it to the trash and empty it.
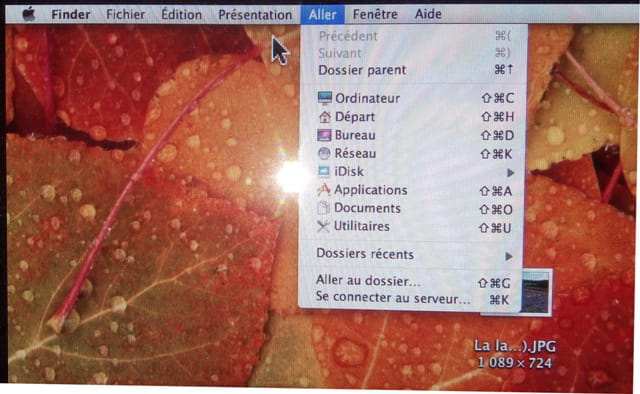
That's surprising... normally, you should have this item if you are properly in a session as an Administrator...
Then try selecting Go / Go to Folder... and paste this command into the window that follows:
~/Library
You will then land in your user library and access your Keychains folder.
It's surprising, but your procedure works. I got the Keychains file that I put in the trash, and as always, there’s a catch... I received the following responses in the image, the last one indicating that it is impossible to perform the operation because the Microsoft_Intermediates_certificates element is in use.
You have it all right. The trash bin is empty. And now I will be able to familiarize myself with the Mac system.
PS: I browse many forums to try to resolve some computer issues, but this is the first time the explanations I've been given are clear, precise, and without room for interpretation. This has allowed me to progress without getting discouraged.
May some take this as an example. Thank you again. Have a good evening.
I would like to add that, since you have a fully operational iMac running High Sierra, you could create a USB installation key to reinstall High Sierra from scratch on this Mac. You will then have a refreshed Mac, meaning it will be clean and free from all the old remnants.
I’m copying something I had already written in my previous publications:
What you need:
- A USB drive with 8 GB of capacity
- Note: On its page, Apple indicates a minimum of 12 GB, but I see that on my finalized 16 GB USB drive, the installer only takes up 5.18 GB.
- Launch the App Store application,
- if you're not logged into your session, do so with your iCloud account credentials
- Search for High Sierra, and click on it
- click the Download button
- let the download run, there are about 5.2 GB to download.
https://support.apple.com/fr-fr/HT211683
or via direct link:
macappstores://apps.apple.com/us/app/macos-high-sierra/id1246284741?mt=12
Also see:
https://support.apple.com/fr-fr/HT201372
Once the raw installation package is downloaded, the raw application can be found in the Applications folder, and
- the installation window opens automatically
- do not click "Continue"
- From the menu bar, go to "Install macOS High Sierra / Quit Install macOS"
- but leave the original application named "Install macOS High Sierra" in its place in the Applications folder.
Preparing the USB installation drive
- insert your blank USB drive into a USB port (not on the keyboard, but on the Mac itself)
- launch Disk Utility found in Applications / Utilities...
- in the left sidebar of Disk Utility, select your USB drive - not its existing partition that appears slightly indented, but the physical drive itself - it will bear the manufacturer's name and indicate its capacity.
- on the right side of the window, click the "Partition" button - under "Partition Scheme" you will see a button indicating "Current"
- drop down this "Current" button and choose "1 partition"
- click on the "Options..." button at the bottom of this area
- choose GUID at the top of the 3 possible choices and confirm with the "OK" button
- make sure the chosen format is "Mac OS Extended (Journaled)"
- name this drive "MyVolume". (Note: if you give this drive a different name, you will need to adjust the command provided in the Terminal that I indicated in step 3)
- click the "Apply" button at the bottom right. (or "OK" button)
- confirm the request for confirmation
- Allow the operation to proceed; it's quite quick.
Note: sometimes Disk Utility hesitates to accept a name other than the default name "untitled" for the USB drive during formatting, just let it do its thing, and rename the drive afterwards, once formatted and mounted on the desktop.
At this stage, it's done. The blank drive is ready.
Creating the installation drive
- Launch the Terminal application found in Applications / Utilities...
- Paste this command line into the Terminal window:
sudo /Applications/Install\ macOS\ High\ Sierra.app/Contents/Resources/createinstallmedia --volume /Volumes/MyVolume
- confirm by pressing the "Enter" key
- when prompted, enter your Administrator password (you will not see what you type, that's normal), confirm.
- Allow the process to run. (It takes about 20 minutes on my end).
- When the Terminal window says "Done," the operation is complete.
- The operations are complete
- Your USB installation drive for High Sierra is ready. This drive will be named "Install macOS High Sierra" and will contain the installer named "Install macOS High Sierra."
Notes on using the drive
To perform an installation from this drive, insert the drive into the Mac, start the Mac while holding down the alt key to choose the drive as the boot medium, then you will be presented with the OS X Utilities window, from there, either start the installation directly, or first go through Disk Utility to erase the destination partition beforehand, or possibly redo the partitioning of the hard drive from scratch.
I'm going to keep all this valuable information "safe and sound," and when I have inspected everything on the two Macs (notably sorting through about 3500 photos), I will be sure to create a USB installation drive to reinstall High Sierra from scratch.
Thank you once again for all your advice and especially for the information that helped me solve my problem.