Cut 2 photos into strips
xnicolasmagicien
Posted messages
18
Status
Member
-
Noreth -
Noreth -
Hello everyone,
Could someone please help me?
I'm looking for how to program a script for Photoshop that would allow me to do the following:
Open 2 photos (A and B for example)
Cut them into strips of a determined size, and create a third file by placing the strips alternately.
Strip 1 from photo A, Strip 1 from photo B, Strip 2 from photo A, Strip 2 from photo B, Strip 3 from A, Strip 3 from B, and so on.
If someone could help me, that would be great!
Have a great day everyone.
Could someone please help me?
I'm looking for how to program a script for Photoshop that would allow me to do the following:
Open 2 photos (A and B for example)
Cut them into strips of a determined size, and create a third file by placing the strips alternately.
Strip 1 from photo A, Strip 1 from photo B, Strip 2 from photo A, Strip 2 from photo B, Strip 3 from A, Strip 3 from B, and so on.
If someone could help me, that would be great!
Have a great day everyone.
16 answers
-
-
Hello
You would achieve the same result by stacking the two images and removing every other strip from the top image... right?-
-
-
by overlapping the two images and removing every other slice from the top image... right?
Well no, wouldn't the meeting of the remaining slices from image A only give a half image A (in surface) and still made up of non-adjacent parts of the images?
Same goes for photo B
But maybe I'm mistaken? -
-
You're not mistaken, I hadn't realized that both images had to be whole.
We need to find a repetitive procedure executable by a script.
First, double the height.
Then, define the strips.
For that, we need to use Guide-guide; otherwise, good luck getting identical strips across the entire height.
Next, define a selection of every other strip, let's say the odd ones, and memorize the selection.
I don't know if a script can retrieve a memorized selection... but let's assume it can.
Re-select the even strips and memorize.
With both memorizations, create layers by copying the even and odd strips from both images.
So far, so good, as the saying goes.
But how to arrange them in the correct order in a script...?
-
-
wait before saying thank you, I didn't swear that I would manage it :)))
I might have found something simpler than my first idea
- open a new document that is double the height of the image size
for example, my images are 800x800 px
so a document of 800 x 1600
- import the two images, place one on top of the other and merge
- divide the entire height into an even number of strips
then, imagine that we do it a bit like in the pushing game
- a memorized selection, so always the same, specifically a vector rectangle of 800 x 100 (I divided it into 16 strips)
- rectangle saved to be able to retrieve and transform it into a selection as many times as needed
it would take place in two repetitive phases
phase 1
- rectangle converted into selection and placed on the strip, layer by cutting, moving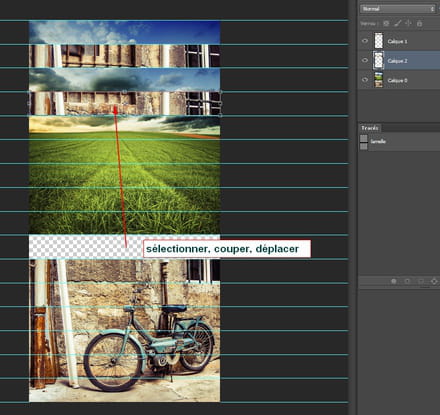
phase 2
- then move the rest of the image down to realign the two images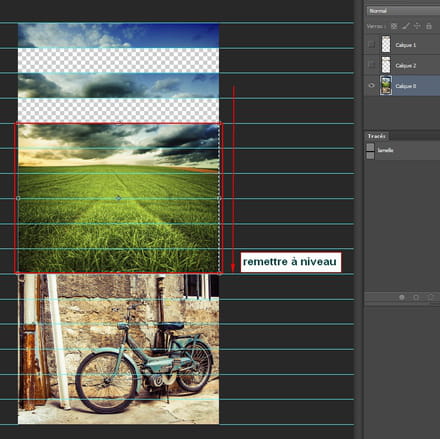
I have hidden the two moved strips so that you understand the idea better
technically, it works
in script... that's another story-
-
-
-
-
The width of the strips depends on the path/selection, they will always be the same since you always transform the same path into a selection for cutting
but the problem is the movements that need to be rigorously precise so that the strips are well joined
the trouble is that they are never the same, so a script won't do it automatically
it will give you - via a dialog box, the possibility to move the cuts but not better!
-
-
I explain the drawing:
you take the rectangle shape tool: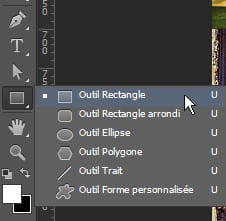
you click just once on your image, the sizing box will open
you enter the measurements of your strip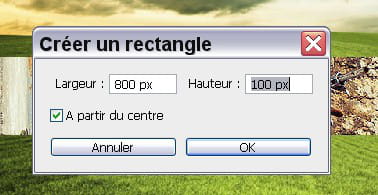
which creates a vector rectangle that you can move at will by calling the transformation with ctrl+T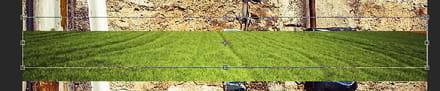
this rectangle is on a layer in your drawing panel
you memorize it: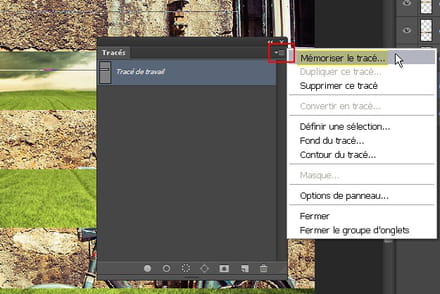
from there, you can convert it to a selection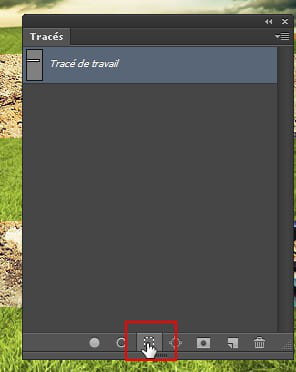
your selections will thus always be the same and your rectangle will remain intact as a path for the next cut
manip: active rectangle in the drawing panel → ctrl+T to place the rectangle → selection in the drawing panel → layer by cutting
okay? -
you could try it another way:
same cutting method, there we don't change anything
but you open two workspaces: one for the two images that you place side by side and another to align your strips
you cut your strips one by one and move them over to the other workspace as you go
it won't go any faster but maybe you won't get your wires crossed as much.... -
hello nicolas
if you pass by here, I suggest a partial solution
not the entire script because 1 I can’t find a way to have the script distribute the slices from both images at once as you would like - 2 because I don’t see myself repeating the same thing 200 times in a script, which would be necessary if we wanted the whole cut to happen in one action
but I have a partial solution that could make your work easier
I created a script to cut the slices from one image and distribute them evenly across the workspace
you just need to place the cutting path and validate, the script does the rest
as many slices → as many times the script
which will give you this:
image 1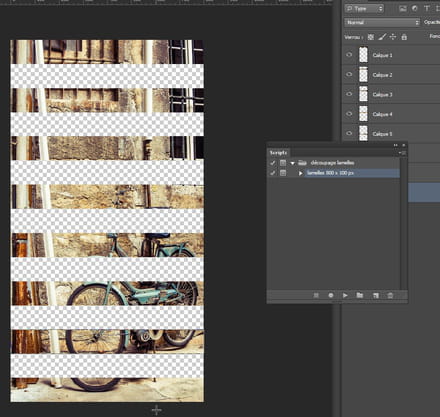
image 2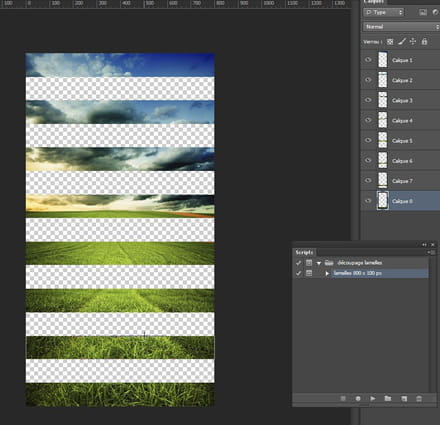
and moving the slices from one image to the other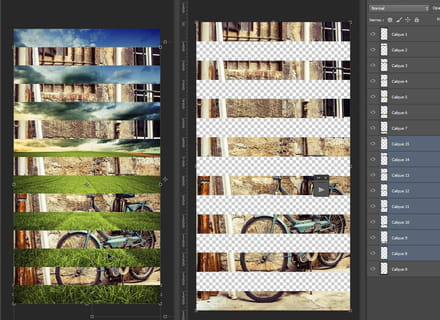
-
to amuse Contrariness who really likes art-cutting ^^

for Nicolas for info:
I spent 8 minutes dividing an image into 40 strips with the script
in total about 20 minutes to make the montage with the 2 images -
for xnicolas and those who want to try
the script:
https://www.cjoint.com/c/FFqjNk2sY6E
configured to cut vertical strips of 800px height and 20px width
the pdf for the procedure
https://www.cjoint.com/c/FFqkjVfBYGE
the screenshots that go with the pdf
https://www.cjoint.com/c/FFqj5PWLlhE
the assembly
https://www.cjoint.com/c/FFqj7plFzDE -
Fredo
from what I've put together to get an idea, the best is a 90° opening
so an isosceles right triangle
so the space between two folds glued to the support = two times the height of the triangle formed by the fold and not two times the width of the strip

-
-
-
Well, I started from a logical observation:
what we know is the width of the strips of the image, the slices if you prefer
so what interests us is to know the base of the triangle to define the spacing of the glued folds
and so if I multiply the width of a slice by the square root of 2, I have my base
just need to heat the glue!
but as you said, it's the same calculation, it's just the way of approaching it that's a bit different
:) -
-
-
-
Hello Nehel,
I'm following up on the script provided a bit earlier. It refers to a layer 0. My Photoshop automatically creates layer 1 instead of layer 0. How can I modify the script to integrate layer 1? I'm having trouble editing the script to change it.-
-
-
I’ll explain: I can't memorize the tracing or it repeats the memorization every time it runs again.
I also can't memorize the movement since it changes with each new slice.
In order to be practical and quick, the tracing needs to match the exact dimensions of a slice so that I don't have to resize it every time the script runs.
In short, the ideal solution is to create the script to the desired dimensions; that’s the best solution.
So, give me the dimensions you want for your slices and I'll redo it for you.
-
-
Good evening Nehel,
My 2 photos are 3264 pixels by 1836 pixels. I suggest making 16 strips of 204 pixels each.
The cut would therefore be 204 X 1836.
Thank you in advance. -
Hello Fredo
your script is ready:
https://www.cjoint.com/c/FHujdqmVFEE
I remind you of the procedure:
- open the image
- unlock it (layer 0)
- run the script
----
thanks to Roudoudou22 who alerted me to an error in the version I posted this morning -
Thank you Nehel. It works great on the 2 photos.
I'd like to learn how to do it rather than bothering you every time!!!
Is it complicated?
Last step: I need to overlay the 2 images with a shift of one slice for the second photo.
I still need help to finalize everything!!!
Thank you in advance.-
Hi Fredo
I would like to learn how to do it instead of bothering you each time!!!
Is it complicated?
Not very complicated, it mostly requires concentration to avoid making mistakes in repetitions and calculations during recording
I can explain it to you if you think it’s worth it
Have you ever done any scripts?
For the editing:
After various tests, the best method is as follows:
- open the first image and process it with the script, do not close it
- open the second image - which will be in a second tab - and also process it with the script
When the second image is cropped:
- window menu → arrange → 2 vertical thumbnails
- select all layers of the second image
- move tool → move the layers into the workspace of the first image
- close the tab of the second image which is no longer needed
- without deselecting → ctrl + T → place the strips of the moved image exactly within the alpha intervals → confirm
Note: Zoom in fully to detect and correct any potential misalignment that might go unnoticed in normal view in such a large image - if necessary, recall the transformation and move pixel by pixel with the keyboard arrows
If it's not clear enough, let me know, and I will send you some screenshots. -
-
-
-
-
hello Fredo
your tutorial:
https://www.cjoint.com/c/FHwiDN1Tb3E
I explained it as simply as possible, I hope it will suit you
have a nice day :) -
Thank you Nehel. It's very comprehensive.
I need to follow the different steps on a concrete example.
I will get back to you as soon as possible because I'm going on a work trip. -
Hi
You are much faster at cutting your slices.
-Open your image, unlock the layer
-Layer, New slice from a layer
Then click on the slice selection tool
-At the top click on convert then on divide
and fill this dialog box to your liking
http://screenshotuploader.com/s/16099w6jk
Finally, file save for web, choose png 24 format to avoid compression, then images and all slices in the options.
All your slices will be in order as png in an images folder and they will be rigorously identical to the pixel without needing any guide or markers.
Finally, when you have created your blank file that serves as a support, go through file script load files into stack, this way you will open all your PNGs at once in the same file and divided into layers and you will be able to click them smoothly onto your final file
If you're interested, you can also save a lot of time for placing the slices with the align and distribute layers commands, just align the top and bottom slice (with the commands) and slightly move all the others as you wish Photoshop will do the rest in one click for perfect alignment and distribution on your background
You make 2 PSDs, one per image and since they will be identical in layout in the end, you assemble them by offsetting the second one, it's actually the simplest after testing.
By eye, less than 10 minutes for a 1600*600 pxl divided into 20 slices, so no need for a script, there are too many variables in your request for it to be worth the time, only the placement of the slices takes a bit of time and it's not automatable.-
I see you're making things difficult for nothing for other things
You need to constrain the size of your image to a round number vertically; it's much easier to divide it, and changing its size by a few pixels won’t matter
For the segments, it's the same; it's much easier to calculate how to distribute 20 or 50 strips of 20 pixels in height than 23 at 20.12 pixels
Then with ctrl T and especially going through the options bar and entering the position numbers manually, there's no need for astronomical calculations to place it pixel-perfectly, but once again with the align and distribute layers command, you don’t need calculations. -
Here’s another solution that’s simpler and faster
I start with an 800-600 image
Using the rectangle tool I draw, it doesn't matter how for now
Press CtrlT and enter 800 px *20 (height at your choice) at the top and confirm
Select your image layer ctrl A, go back to your rectangle, press V and align the top and left edges at the top
your first strip is perfectly placed
press ctrl J to duplicate the rectangle, and redo ctrl T
in Y you set the offset you want to achieve (here 40 px since there’s a 20 px strip every 20x
http://screenshotuploader.com/s/1609txq-c
confirm
magic warning hold down ctrl alt shift T at the same time and press enter as many times as needed and it will duplicate all the strips correctly in 2 seconds
http://screenshotuploader.com/s/1609sme54
finally merge your two rectangle layers and put a clipping mask and it will look like this
http://screenshotuploader.com/s/1609u3otf
save in psd or png
finally copy the shape layer that serves as a clipping mask, rotate it vertically by 90 * and it will replicate the second part of the image with the missing bands
The same for the second image, the same shape layer for the clipping mask will be used twice and finally you assemble and merge your 4 files onto your final blank file of 800-1200 px for this case
The advantage, in addition to speed, is that by keeping it in PSD you have a template that can be used repeatedly for all the images you want to make later with the same dimensions and the same number of strips, and we can even create a very easy script with this file -
the second method is scriptable end-to-end for an image of the same dimensions since Photoshop remembers how many times you press ctrl alt shift T but it's not very useful since all these bands and a cropping like this took me 2 to 3 minutes max
http://screenshotuploader.com/s/1609m5546
then I duplicate the image and make a vertical symmetry on my cropping layer and I have the second part of my first image; just need to open the second image and do the same
Warning For it to work and be perfectly aligned you need round numbers, for example, divide into strips of 20 px high spaced by 20 px and you will start
the first exactly at the top of the layer and the last should be 20 pixels from the bottom edge, which will happen automatically if the image height is a multiple of the strip height so with the vertical symmetry, it will be the opposite so exactly
For your 4 psds, at the end you align the first and the last at the top left and bottom left as I indicated using the align layers command and finally you select all 4 and with the distribute command they will be arranged correctly
A + if you come back and you didn't understand something but I think I covered everything
-