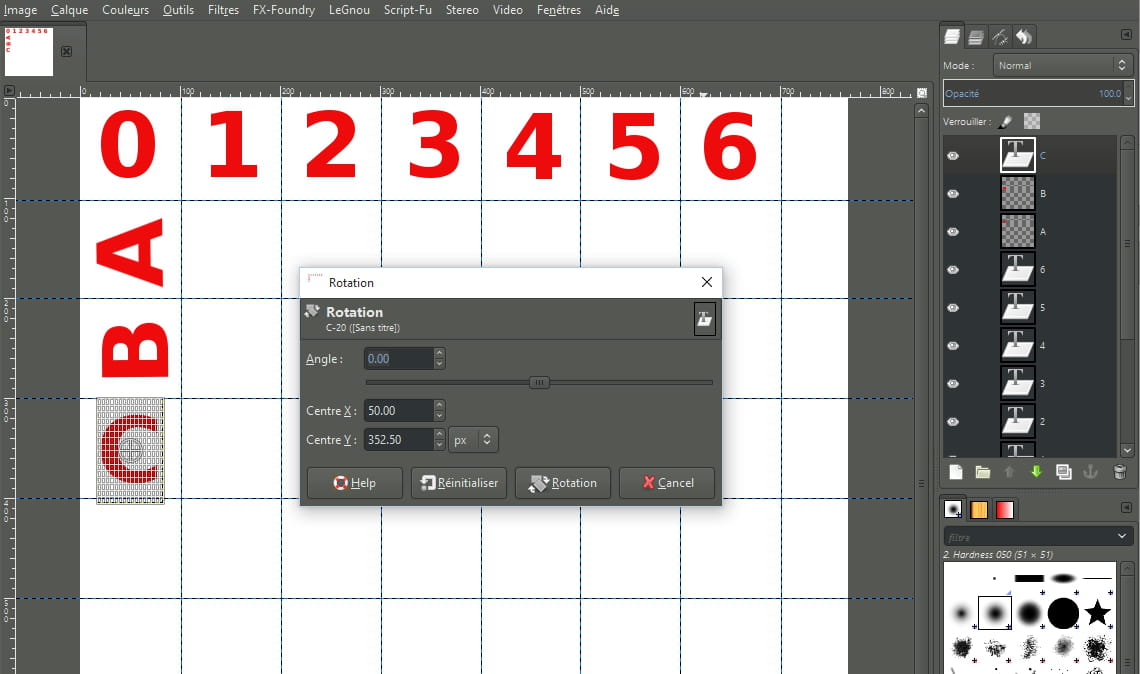
Divide an image into numbered squares with numbers.
noname835
Posted messages
5
Status
Member
-
noname835 Posted messages 5 Status Member -
noname835 Posted messages 5 Status Member -
Hello,
I have been desperately looking for help to divide an image for a long time.
In fact, I would like to divide a photo into several numbered squares using software.
The easiest way is to show you an example done by hand.
http://hpics.li/a192813
The horizontal line goes up to number 10, but I would like to go much higher to be able to divide my photo into smaller parts.
The same goes for the vertical line that goes up to letter h; I know I can't go beyond letter 'z', but is it possible to have numbers on the vertical line?
My goal is to hide an object in an image and for the internet user to tell me 'ah, the object is located at h18 and v36.'
I’m not sure if I’m making myself clear, but thank you for any little help you can provide.
Configuration: Windows / Firefox 43.0
I have been desperately looking for help to divide an image for a long time.
In fact, I would like to divide a photo into several numbered squares using software.
The easiest way is to show you an example done by hand.
http://hpics.li/a192813
The horizontal line goes up to number 10, but I would like to go much higher to be able to divide my photo into smaller parts.
The same goes for the vertical line that goes up to letter h; I know I can't go beyond letter 'z', but is it possible to have numbers on the vertical line?
My goal is to hide an object in an image and for the internet user to tell me 'ah, the object is located at h18 and v36.'
I’m not sure if I’m making myself clear, but thank you for any little help you can provide.
Configuration: Windows / Firefox 43.0
4 answers
-
Good evening,
Yes, it’s easy to understand, but we need to find out if you want to create a series of images like a card game or if you want to make an interactive image...
In the case of an interactive image, it's not going to be easy, and I don't even know if it's feasible just in graphics, whereas the card game style, on the other hand, is very simple to create...
If you don’t have software, I would recommend GIMP, which, in addition to being free, will be simpler for this kind of manipulation than Photoshop (expensive or cracked and with bugs in it), although both of these programs are certainly capable of doing this without much difficulty...
Luke.
--
The price of software is inversely proportional to its ergonomics... ;-) -
You want to do something like this but more polished and sophisticated
or do you want to keep the numbers vertical?
Luke.
The price of a software is inversely proportional to its usability... ;-)-
Yes Luke, something like that, but depending on the resolution of the photo, set it from 0 to 99 for example.
Now in the left column I might also put some numbers, but the end result remains the same.
The user just needs to enter, for example, h27 v38.
But for the sake of clarity of the photo, I will first display the photo without a grid and then, when the user finds the object, they can click on an option and the same photo with a grid will appear over the photo without a grid.
-
-
I can explain how to create the grid and the adaptable layer for your images, but I don't know how to do the rest.... :-((
You'll have to wait until someone more knowledgeable than me... :-/
Luke.
--
The price of software is inversely proportional to its usability... ;-)-
-
To do this and to be able to use it multiple times, you need to create a large layer, larger than your images in fact: you can reduce without loss but not enlarge without significant loss of quality...
- You open a new transparent image, actually a layer.
- You open a white one that will be deleted at the end but will allow you to have a background to see everything.
- Based on the rules, you create the outline of your grid with vertical and horizontal guides.
- With the pen tool (called path tool in GIMP) you trace all your vertical and horizontal lines on the guides.
- You go to Edit --> Stroke path and your grid is finished in the color you choose.
- You just need to use the text tool to add letters and numbers.
- You save everything in XCF so you can always find it in case of future mishandling.
- You delete the white layer that served as your background.
- You export as PNG to keep the transparency of your layer.
It's done, you just have to overlap the saved PNG layer onto each image you want to process, this way it will serve you indefinitely by merging it with each image......
Quick example:
- https://www.cjoint.com/doc/16_01/FAcwDBvHS3b_0001.png
- https://www.cjoint.com/doc/16_01/FAcwElNlhhb_0002.png
- https://www.cjoint.com/doc/16_01/FAcwEUFPuub_0003.png
- https://www.cjoint.com/doc/16_01/FAcwFJnBClb_0004.png
- https://www.cjoint.com/doc/16_01/FAcwGrHUkXb_0005.png
Have a good evening. ;)
Luke.
-
-
Thank you, Luke, for the response.
In fact, the image does not need to be interactive.
When the user finds the object, they enter, for example, h for horizontal and v for vertical, resulting in:
h28 v36, all within a PHP code that validates to move on to the next image.
I did try with the GiMP software, I can separate using grids but I cannot number the horizontal line from 1 to xxx and the vertical line from 1 to xxx
the 'xxx' depends on the size of the image to be grid.