
How to access the stack on easy note MX36
Solved
veroyeti
Posted messages
2
Status
Member
-
Karine942 -
Karine942 -
Hello,
I am presenting the problem I just encountered and after reading some responses on your forum, I armed myself with patience and courage and started to disassemble my computer to change the battery. But I'm stuck because I lack the disassembly diagram (not provided). So here it is:
My laptop is a PACKARD BELL EASYNOTE MX36-4-057W1ST purchased in May 2007.
Here is the error message that appeared:
American Megatrends
Boot Selection Popup menu has been selected
Initializing USB Controllers.. Done
896 MB OK + 128 MB Shared Memory
Auto-Detecting Pri Slave... ATAPI CDROM
Auto-Detecting 3rd Master.. IDE Hard Disk
Pri Slave : Optiarc DVD RW AD-5540A 2.61
Ultra DMA Mode-2
3rd Master : ST 9160821AS 3.ALC
Ultra DMA Mode-6, S.M.A.R.T. Capable and Status OK
Auto-detecting USB Mass Storage Devices..
00 USB mass storage devices found and configured.
CMOS Battery Low
CMOS Checksum Bad
CMOS Date/Time Not Set
Press F2 to Run SETUP
Press F1 to load default values and continue.
I tried both F2 and F1, result: each time it asked me for a password that I don't have. On the 3rd attempt, here is its response:
System Date: 05-14-2007
Password check failed
Press F2 to Resume
I complied, and the following prompt appeared:
Please select boot device:
CD/DVD: PS-optiarc DVD RW AD-554
SATA: 3M-ST9160821AS
Whatever my choice, I fell into the BIOS SETUP UTILITY, followed the instructions in the EXIT tab, but nothing happened; the screen reverted to the first message.
Last night before going to look under the hood of the computer, I tried restarting it again. This time, the BIOS SETUP no longer appears; when I press F2, I find myself facing a black screen with a small blinking cursor at the top left. Additionally, the power button of the computer is unresponsive; I had to press a small button located in a very small spot (a small hole) under the computer with a paperclip.
Since then, it has been disassembled, but I lack, for good progress, the disassembly diagram and any advice would be greatly appreciated. The DVD burner/reader is still in place; should I remove it, same for the USB ports? If yes for the reader, how should I proceed, because it requires power to open; if I reinsert the battery, is it possible and most importantly, is it not too dangerous since I have already removed some components?
I do not dare to force the keyboard away from the base, as this is a first for me and I am a novice in this matter.
Thanks in advance.
Best regards
Configuration: Windows XP Firefox 3.5.5
9 answers

"my 'stupid' question: what does the battery look like?"
No stupid question. The battery looks like a watch battery, just larger and thinner: a metal circle with a slightly domed part on one side, encircled by a thin black line separating the + side (the larger flat side) from the - side (the smaller domed side).
This shape allows for a support where a tab makes contact with the -, and a sort of clamp makes contact with the + on the edge of the battery, keeping the battery in place.
"Is it located above the motherboard after removing the keyboard or below it?"
I don't know... on the component side, probably below.
"So do I need to keep removing the screws on the motherboard marked with a small triangle?"
I don't know, it depends on the chassis design.
--
Because the manuals don't say everything... but not nothing either, huh!
Disassembling a laptop can be daunting for many, and that's understandable!
This process is impossible without slightly damaging the casing (nothing too serious), as it is not designed to be taken apart. But with a very fine screwdriver (2 to 3 mm in diameter), you can remove the keyboard by manipulating the clips hidden under the keyboard, on the edges...
However, depending on the laptop, and in most cases, you actually need to start by removing all the accessible panels underneath. Place each removed screw on a pencil-drawn plan on a large sheet of paper (handy tip ;)
If the laptop is thin enough, the motherboard (and nothing else either) is not stacked on the CD drive, and removing it won't make accessing the CMOS battery easier (because if I've understood correctly, that's the battery you're trying to access).
--
Because instructions don't say everything...
But not nothing either, right!
Hi,
This is unrelated to the question, but I see you have a Packard Bell MX36, and I just saw this on their website: (in the support section)
Recall
EasyNote MX36, MX37, MX51 and MX52
https://customercare.packardbell.com/customercare/PBUpdate.aspx
This is unrelated to the question, but I see you have a Packard Bell MX36, and I just saw this on their website: (in the support section)
Recall
EasyNote MX36, MX37, MX51 and MX52
https://customercare.packardbell.com/customercare/PBUpdate.aspx
Thank you Erwan
I will follow your advice and I confirm that the case doesn't like being poked by screwdrivers, but it doesn't matter, it's the result that matters. Namely, managing to reach the CMOS battery. (You understood well, sorry for not being clear but this is a first for me, both the forum and disassembling the PC).
I will follow your advice and I confirm that the case doesn't like being poked by screwdrivers, but it doesn't matter, it's the result that matters. Namely, managing to reach the CMOS battery. (You understood well, sorry for not being clear but this is a first for me, both the forum and disassembling the PC).
No problemo!
Just follow my advice and trace the shapes of the case panels on a piece of paper, with little circles where the screws go so you can place them, along with the necessary notes on the disassembly order...
For safety, do it unplugged and with the battery removed.
Discharge any static electricity by touching the ground plug...
--
Because the manuals don't say everything...
But they don't say nothing either, okay!
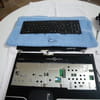
I reached the motherboard, unclipped the keyboard with a steel nail file.
Here’s my “silly” question: what does the battery look like? Is it located above the motherboard after removing the keyboard, or below it? That is, do I need to keep removing the screws on the motherboard marked with a small triangle?
Here’s my “silly” question: what does the battery look like? Is it located above the motherboard after removing the keyboard, or below it? That is, do I need to keep removing the screws on the motherboard marked with a small triangle?
"How can you be sure that it's a battery and not a soldered battery?"
The CMOS battery is always a battery placed in a dedicated holder. This has been part of the standards created since the days of 'IBM compatible' PCs.
"When I went to see a specialist, he told me that in some cases, CMOS batteries are soldered."
Ah! I had never heard of that before... I'll take note!
"Has anyone thought of taking pictures of their disassembly?"
Yes, I have. On an Amilo Xi 1546... but overall it's the same!
"A priori, from what you’re saying, you have to disassemble everything."
To access the motherboard as a whole, it is often necessary, yes.
"So I removed [...] the hard drive [...] and most of the screws. But there are still blocking points. Do I necessarily need to remove the keyboard? The screen?"
The screen, not really, but when handling the chassis, you have to be careful not to bang it... As for the keyboard, it is located on the other side of the battery, so it shouldn't be a problem.
--
Because the manuals don't say everything... But they don't say nothing either, huh!
Hello, I have a small problem with my Packard Bell PC. It crashed, so I turned it off and turned it back on, but the screen was all black. I repeated this process twice, but it was still the same. Then I pressed the button underneath the PC with a needle, and now it shows a page with buttons F1 and F2 asking for a code at startup, but I don't have it. If anyone knows and could help me, thank you in advance.
The battery replacement operation is complete, the computer has been reassembled the same way and I found out that it works without any issues. It powers on and boots directly into Windows. Test to be confirmed.
Thanks again for the information.
Best regards.
Like many, I'm facing the same issue with my Easynote MX36. CMOS Battery low... In short, the CMOS battery is dead.
How can I be sure it's a battery and not a soldered battery? A specialist told me that in some cases, CMOS batteries are soldered.
Has anyone thought to take pictures of their disassembly? Or does anyone have a picture of the motherboard to show me? It's to visualize where that damn battery is.
Anyway, I started disassembling it. Apparently, as you've mentioned, everything needs to be taken apart. I only wanted to disassemble what was essential. I thus removed
- the hard drive cover, the hard drive, the 4 screws underneath.
- the CPU cover and the 4 K screws
- all visible screws underneath the laptop.
But there are still some blocking points. Do I necessarily have to remove the keyboard? The screen?
Thank you for your help
I think the ideal approach is to disassemble in stages and take photos each time.
Here is the link to the text that helped me: https://www.thesiteoueb.net/forum/sujet-3720-packard-bell-easynote-mx36-u-057w.html
Re: PACKARD BELL EASYNOTE MX36-U-057W
Buy the CR2032 battery before disassembly and allow for a day and space to carry out the disassembly and reassembly.
I haven't identified the cause of the premature wear of the battery < 3 years. I just taped over the shielding above the battery to prevent any potential short circuit.
For everyone, the symptom of a tired battery is increasingly frequent loss of time.
On the first start after changing the battery, go into the BIOS and enter the time, date, and BIOS default values.
There are disassembly guides available; I’m thinking of one from Toshiba Satellite, very well done with photos that we can take inspiration from.
Good luck and patience, and you won't break anything.
That's Murphy's Law in action...
A good labeling technique: draw each panel you've removed on a large sheet of paper, with circles where the screws go. In each circle, place the corresponding screw, and you shouldn't have any leftover screws at the end! ;)
--
Because instructions don't tell you everything...
But they don't say nothing either, right!