Plugins to unwarp book photos
dreamcatcher
Posted messages
193
Status
Member
-
dreamcatcher Posted messages 193 Status Member -
dreamcatcher Posted messages 193 Status Member -
Hello,
I can't seem to find a good solution to remove moiré from scanned photos taken from books. While doing my research, I came across Gimp and two extensions that go with it: Greycstoration and GMIC. Apparently, Greycstoration no longer exists and has been replaced by GMIC.
I then installed it on Gimp 2.8, and the operation is far from straightforward. It takes a long time, about fifteen to twenty minutes, and on top of that, it crashes easily.
Do you know of a stable version of Gimp where this GMIC extension is already installed and works well? Or another solution, please?
Have a nice day!
Configuration: Win 7, 2 GHz CPU, 3 GB of RAM
I can't seem to find a good solution to remove moiré from scanned photos taken from books. While doing my research, I came across Gimp and two extensions that go with it: Greycstoration and GMIC. Apparently, Greycstoration no longer exists and has been replaced by GMIC.
I then installed it on Gimp 2.8, and the operation is far from straightforward. It takes a long time, about fifteen to twenty minutes, and on top of that, it crashes easily.
Do you know of a stable version of Gimp where this GMIC extension is already installed and works well? Or another solution, please?
Have a nice day!
Configuration: Win 7, 2 GHz CPU, 3 GB of RAM
4 answers
-
Hello,
I see that you have Windows 7 with only 3GB of RAM. The minimum RAM required for Windows 7 is 4GB, so it's no wonder it's slow.
On this page for Gmic, you have the installer (installer) that you can download and run for it to install itself.
http://gmic.eu/gimp.shtml
Since you don't have much RAM, I recommend closing all other applications when using Gimp to avoid crashes.
With Gmic, you also have the option to use it directly online. Just look next to "Documentation" for G'MIC Online.
--
"To create any change in our lives, we must start by expressing gratitude for what we already have." -
Oh la la, I don't have a scanner but it seems to me that we can set the dimensions of a scanned file because this one is really huge. Already you have only 3GB of RAM and I find it really surprising that you were able to open this image with Gimp.
You can still reduce the size of this scanned file with Gimp and save it immediately as .xcf (Gimp's native format) to be able to work on it later:
Image, Scale and Image Size and in Width and Height you enter "divided (/) by 6" as shown in the screenshot below and in x and y resolutions you put 72,000 pixels. Save it right away: Ctrl S.
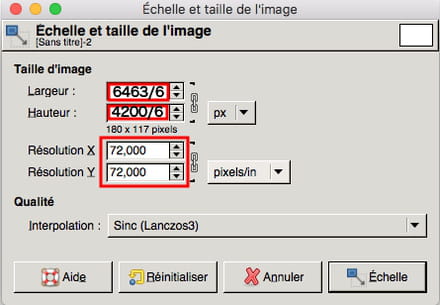
Note that you can divide by 5 or 4 or 3 or 2 ... as you wish.
--
"To bring about any change in our life, we must start by expressing gratitude for what we already have." -
I don't know what you want to do with your scan, but generally the scanner driver has a de-skewing function in its options.. (that's the case with Epson).
The other method is to apply a Gaussian blur..
In both cases, it is still a loss of detail... -
Re,
Here are the G'MIC plugins that I tried with Gimp and that yielded a positive result anyway
Parts:
Details = Sharpen deblur
Lights and Shadows = Burn and the second Contrast swiss mask
There is a plugin for scanned documents but it's not very effective: part Repair and Repair scanned document.
Suggestion:
Once you have applied your plugin, create a new white layer and move it to the bottom of the layer stack.
Position yourself on the layer above (the one with the applied plugin).
With the 5 tools below, you can select the areas you want from this layer and "Edit, Delete" or press the Delete key on your keyboard.
Duplicate this retouched layer and set it to "Multiply" mode and play with its opacity if it's too dark.
You will have a nice all-white background. In the end, you merge everything and save.
Example:
--
"To bring about any change in our lives, we must begin by expressing gratitude for what we already have."