
The "Group" reappears in the Downloads folder display.
Homer6180
Posted messages
43
Status
Membre
-
pistouri Posted messages 19008 Registration date Status Contributeur Last intervention -
pistouri Posted messages 19008 Registration date Status Contributeur Last intervention -
Hello
For the past few days, my Downloads folder is displaying grouped by date.
I right-clicked, chose the grouping option, and then "none".
The folder is therefore displayed without grouping.
My problem is that the "grouping" reappears at startup or sometimes even during the session, as if the "none" option was disabled.
Any ideas?
PS: all my updates have been completed.
I am on Windows 10 Home.
For the past few days, my Downloads folder is displaying grouped by date.
I right-clicked, chose the grouping option, and then "none".
The folder is therefore displayed without grouping.
My problem is that the "grouping" reappears at startup or sometimes even during the session, as if the "none" option was disabled.
Any ideas?
PS: all my updates have been completed.
I am on Windows 10 Home.
1 réponse

pistouri
Posted messages
19008
Registration date
Status
Contributeur
Last intervention
Ambassadeur
8 719
Hello,
Windows 10 Downloads Folder – Remove Grouping and Sorting by Date.
When files are grouped by date, all files and folders are separated into dates.
For example, if you downloaded a file today, it will be grouped in the Today section.
Files downloaded last week will be grouped under Last Week, and so on.
In summary, the most recent files will always appear at the top.
In theory, this makes it easier to find recently downloaded files
However, grouping by Date Modified makes the files more cluttered. Additionally, finding files can be a bit more challenging if they were not recently downloaded. For instance, when files are grouped by date, even if the files are sorted by type, they are still grouped by dates.
1]Restore the view for files grouped by date modified in the Downloads folder
Open Windows Explorer.
Then open the Downloads folder.
Click on the View tab, then on Group by in the drop-down menu.
Select from the list -► None

Files will be restored to the view that the Downloads folder is set to.
Now, you may notice that the Save As dialog continues to display items grouped by date.
2] Group by -► none
Right-click on any empty area of the dialog box
And select Group by -► none
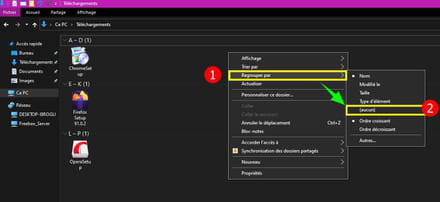
3] Changes not applied
But sometimes once you have applied the changes, not all files are sorted and revert back to how they were.
But files and folders will be classified by modified dates again a few minutes later or upon restarting the PC.
So, it needs to be set permanently.
Open Windows Explorer.
Click on the Explorer ribbon on -►View
Then click at the end of the ribbon on the right on -►Options
Click on the line -► Change folder and search options
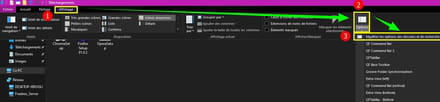
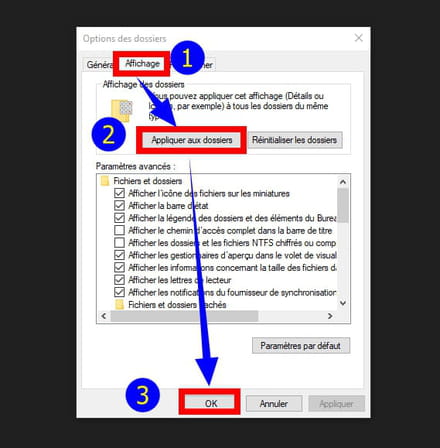
This will open a folder options window.
Click on the -►View tab
Click on -►Apply to folders
Click on -►OK
Note :
Do not accidentally click on Restore default settings, as this will restore all view settings.
4] BagMRU and Bags
If the problem persists, delete the BagMRU and Bags keys.
In the "search box" on the taskbar, type -► regedit
Open the registry editor.
--► Backup the registry
-►Go to the registry key below:
HKEY_CURRENT_USER\Software\Classes\Local Settings\Software\Microsoft\Windows\Shell\BagMRU
Right-click on the BagMRU and Bags keys, one after the other, and then click -► Delete
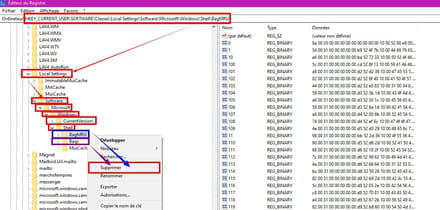
Close the registry editor window.
Restart the PC.
5] PowerShell Command
If the problem persists:
In the "search box" on the taskbar, type -► powerShell
Right-click on -► WindowsPowershell
Then -►Run as Administrator
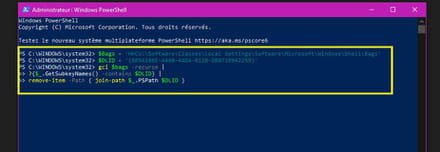
In the WindowsPowershell window, copy/paste the command below:
Press the Enter key on the keyboard.
Close the WindowsPowershell window.
Restart the PC
Then apply method 1 and method 2 if needed.
6] CCM Tutorial
==► Use grouped view in Windows 10 Explorer
That's all.
See you later.
Windows 10 Downloads Folder – Remove Grouping and Sorting by Date.
When files are grouped by date, all files and folders are separated into dates.
For example, if you downloaded a file today, it will be grouped in the Today section.
Files downloaded last week will be grouped under Last Week, and so on.
In summary, the most recent files will always appear at the top.
In theory, this makes it easier to find recently downloaded files
However, grouping by Date Modified makes the files more cluttered. Additionally, finding files can be a bit more challenging if they were not recently downloaded. For instance, when files are grouped by date, even if the files are sorted by type, they are still grouped by dates.
1]Restore the view for files grouped by date modified in the Downloads folder
Open Windows Explorer.
Then open the Downloads folder.
Click on the View tab, then on Group by in the drop-down menu.
Select from the list -► None

Files will be restored to the view that the Downloads folder is set to.
Now, you may notice that the Save As dialog continues to display items grouped by date.
2] Group by -► none
Right-click on any empty area of the dialog box
And select Group by -► none

3] Changes not applied
But sometimes once you have applied the changes, not all files are sorted and revert back to how they were.
But files and folders will be classified by modified dates again a few minutes later or upon restarting the PC.
So, it needs to be set permanently.
Open Windows Explorer.
Click on the Explorer ribbon on -►View
Then click at the end of the ribbon on the right on -►Options
Click on the line -► Change folder and search options

This will open a folder options window.
Click on the -►View tab
Click on -►Apply to folders
Click on -►OK
Note :
Do not accidentally click on Restore default settings, as this will restore all view settings.

4] BagMRU and Bags
If the problem persists, delete the BagMRU and Bags keys.
In the "search box" on the taskbar, type -► regedit
Open the registry editor.
--► Backup the registry
-►Go to the registry key below:
HKEY_CURRENT_USER\Software\Classes\Local Settings\Software\Microsoft\Windows\Shell\BagMRU
Right-click on the BagMRU and Bags keys, one after the other, and then click -► Delete

Close the registry editor window.
Restart the PC.
5] PowerShell Command
If the problem persists:
In the "search box" on the taskbar, type -► powerShell
Right-click on -► WindowsPowershell
Then -►Run as Administrator
In the WindowsPowershell window, copy/paste the command below:
$Bags = 'HKCU:\Software\Classes\Local Settings\Software\Microsoft\Windows\Shell\Bags'
$DLID = '{885A186E-A440-4ADA-812B-DB871B942259}'
gci $bags -recurse |
 ?{$_.GetSubkeyNames() -contains $DLID} |
 remove-item -Path { join-path $_.PSPath $DLID }
Press the Enter key on the keyboard.
Close the WindowsPowershell window.
Restart the PC

Then apply method 1 and method 2 if needed.
6] CCM Tutorial
==► Use grouped view in Windows 10 Explorer
That's all.
See you later.